Product documentation
MFS includes functionality for the user to create his/her own service tasks from on the device itself. In this situation there is no need for the back office to create and schedule a service task for it to appear in the app.
Situations where this functionality might be useful:
When an engineer needs a new task outside back office working hours.
When an engineer is offline, and he needs a new task.
When customers are allowed to directly contact engineers for extra work.
Tasks created this way are intended to be ‘direct tasks’ and possibly billable tasks. For registering ‘overhead tasks’, we refer to chapter Indirect Hours.
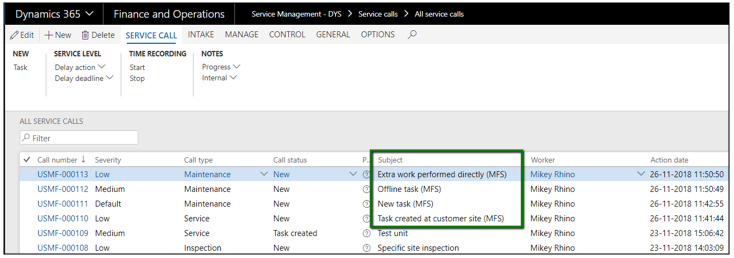
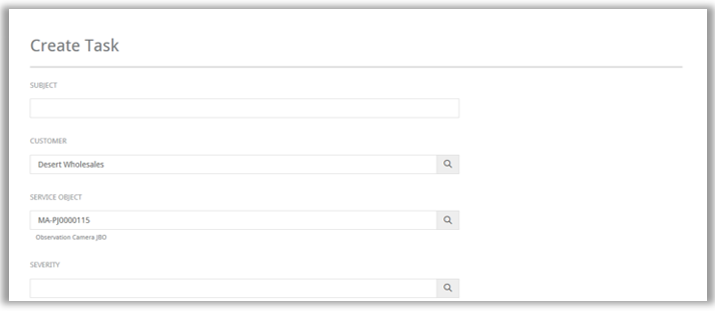
To start creating a service task in MFS, select the ‘Create Task’ button from the Home Page or from the task list left menu bar.

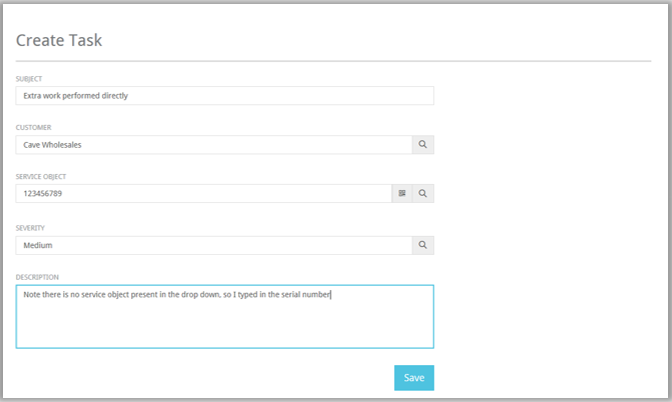
In order to create the task, the fields Subject, Customer and Description are mandatory fields. After saving the new task, it is visible in today’s task list.
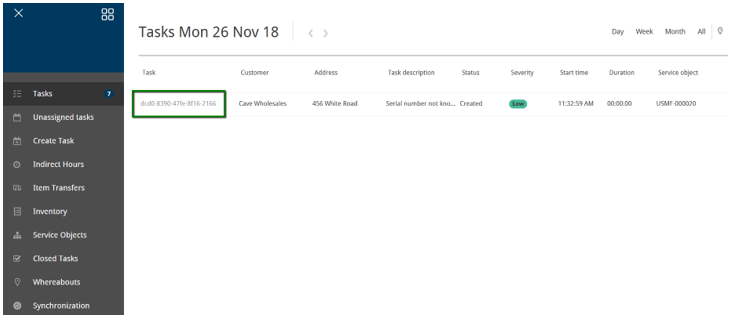
Tasks created by the engineer in MFS behave the same way as service tasks planned by the back office. There is one exception: if the task created in MFS has not yet been synchronized to Microsoft Dynamics 365 for Finance and Operations , it is possible to delete the task (for example in offline mode).
Note that when the MFS app is online, the service task will be synchronized automatically and cannot be deleted anymore.
The MFS created task is displayed with the created date/time and a duration of 0 hours. The task ID is auto-generated in a unique format which doesn’t match the task number in the Microsoft Dynamics 365 for Finance and Operations and is stored in the service call field ‘External call reference’.
It is possible to select an existing service object, enter a non-existing service object or leave the field service object empty. In the situation that a non-existing service object is entered, or the service object is left blank, the service call will be created with a default service object from the MFS parameters.
When the task is synchronized to Microsoft Dynamics 365 for Finance and Operations , the MFS task ‘Subject’ field will be used for the service call subject field. The service call is created with the call type from the MFS parameters and the subject field is updated with an extra (MFS) indication.
Further, non-existing service object reference plus task description are inserted in the service call message field as well.

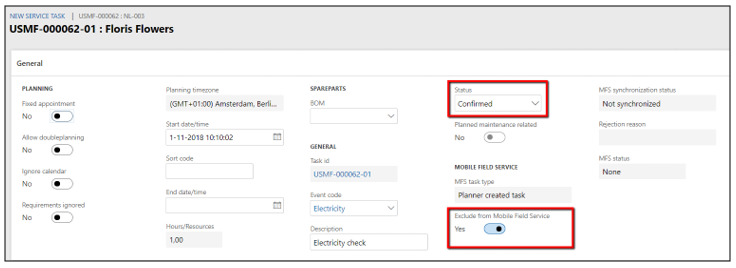
A service task is created and set to status ‘Confirmed’. Note that the service task does not have an event code and no hour lines yet.
The ‘Description’ field from the MFS task is used as service task description. Further, the flags ‘System created task’ and ‘Exclude from Mobile Field Service’ are set which will prevent the service task to be sent to MFS again, in case it will be scheduled for whatever reason (it should not be scheduled).

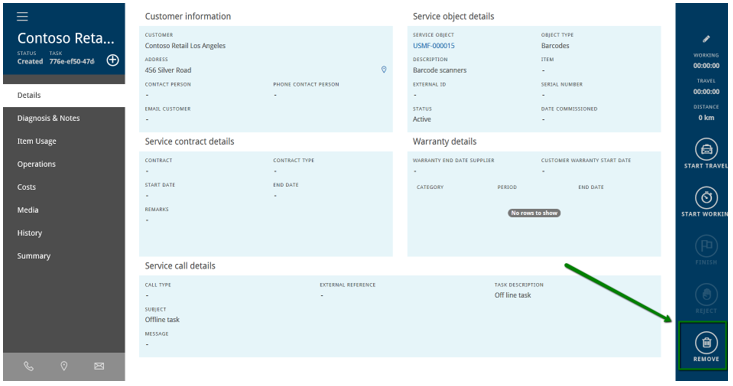
The task created in MFS can be processed the same way as a task that is received from the back office. Once the task is reported as finished, the task will be synched to Microsoft Dynamics 365 for Finance and Operations again and the service call and service task will be updated (or created and updated) with the task registrations.
Note that when the service call is still linked to the default service object from the MFS parameters, it will not be possible to post transactions in the service task. First the ‘Call adjustment’ reassign function should be used in order to link the correct service object to this service call/task.
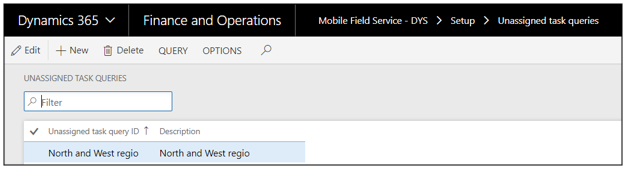
We have functionality in MFS to select tasks that are not scheduled or started. This allows engineers to add additional tasks to their schedule without the back-office doing the planning and scheduling.
Engineers can import unassigned tasks from Microsoft Dynamics 365 for Finance and Operations . They can only work with this feature when they are online. A new tab has been added, called Unassigned tasks, below the regular tasks.
Please note: the service tasks need to be on status confirmed to be imported, any other status (quotation, scheduled, in progress) will be excluded.

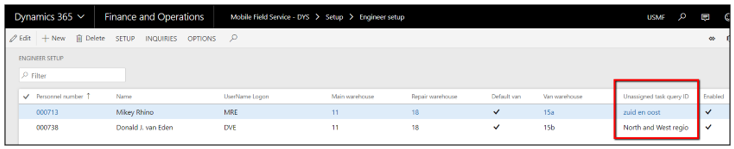
Setup is simple. You need to create a task-query. Path: MFS – DYS > Setup > Unassigned task queries.
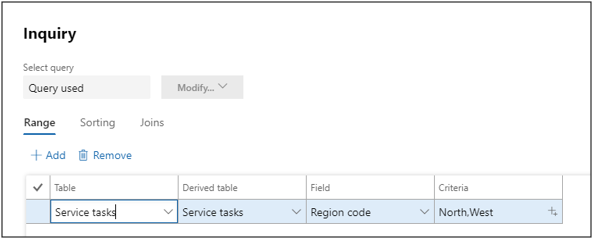
Below an example of a query which selects region codes North and West from the task.
The system automatically filters on task status confirmed and the exclude from MFS fields. Meaning: only status confirmed are selected and exclude from MFS needs to be set to NO.
Query example:
You link the query to the engineer with the unassigned task query ID field.
Path: MFS – DYS > Setup > Engineer setup.
When the engineer is online, they can import the tasks that fall within the limits of the query setup in the previous chapter. A list with unassigned tasks will appear in MFS.
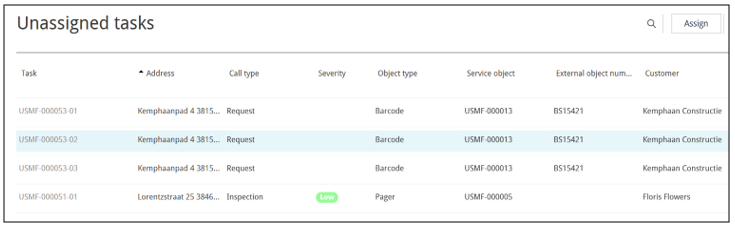
Select the task that you wish to work on and click the assign button in the top right corner. Once you click on assign, the task status immediate changes to ‘scheduled’ because this action is synchronized with Microsoft Dynamics 365 for Finance and Operations . The selected task is opened in MFS.
In MFS the functionality Indirect Hours enables the engineer to register his/her indirect or overhead hours spent. This is time spent that is not directly related to a service task for a customer. Examples of these type of hours could be:
To start registering indirect hours in MFS, select the ‘Indirect Hours’ button from the Home Page or from the task list left menu bar.
Each indirect hour line shows information, such as category of the indirect hour line, start- and end date & time and duration in hours. Indirect hours are not automatically synchronized and can be edited or removed before synchronizing the Microsoft Dynamics 365 for Finance and Operations .
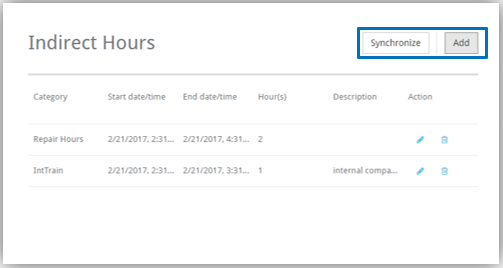
Click the ‘Add’ button in the top-right corner to create a new indirect hour line. In the pop-up form, the engineer can select a category from a drop-down menu and enter start- and end date/time for the indirect hour line and add description. The category refers to the type of indirect task. Categories listed here are equal to the categories available in the Microsoft Dynamics 365 for Finance and Operations back office. The duration of the task is automatically calculated.

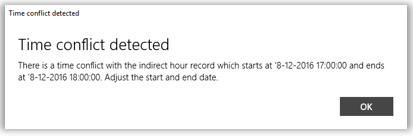
When entering indirect hours, a check is also performed if these hours are registered in a ‘free’ slot. If this is not the case, an error message will be displayed. This message can be related to another indirect hour line or a service task for which time already have been registered in that specific timeslot.
If the user clicks on the ‘Synchronization’ button, which is placed on the left side of ‘Add’ button on the top of the form, the changes will be immediately synced to Microsoft Dynamics 365 for Finance and Operations . Once synchronized to Microsoft Dynamics 365 for Finance and Operations , the indirect hours are not visible anymore in MFS.
When the indirect hours are synchronized to Microsoft Dynamics 365 for Finance and Operations , a service call is created using the settings from MFS parameters in Microsoft Dynamics 365 for Finance and Operations :

For each engineer that reports indirect hours a service task is created under this service call:

In the details of the service task, the indirect hour lines are visible and posted.
In MFS the functionality Item transfers enables the engineer to order, move and receive items back and from the main warehouse or from other service vans. There are several types of item transfers supported.
In Microsoft Dynamics 365 for Finance and Operations a transfer order from the main warehouse to the engineer’s van (warehouse) is the trigger to send a transfer from Microsoft Dynamics 365 for Finance and Operations to MFS. Note that the control of the stock inventory levels of the items in the engineer’s van, are supported by standard MRP functionality. The result of refilling triggered via MRP will then be the transfer orders generated in Microsoft Dynamics 365 for Finance and Operations . It is also possible to create a transfer order manually in Microsoft Dynamics 365 for Finance and Operations .
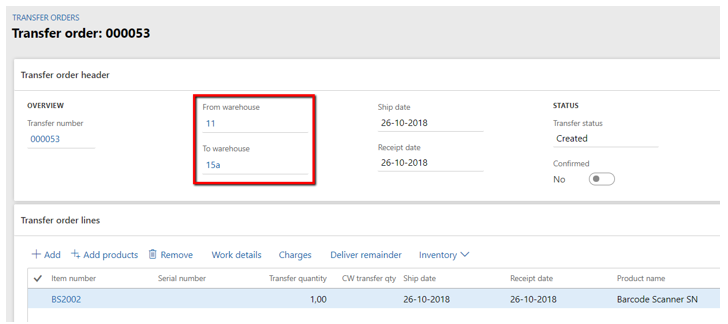
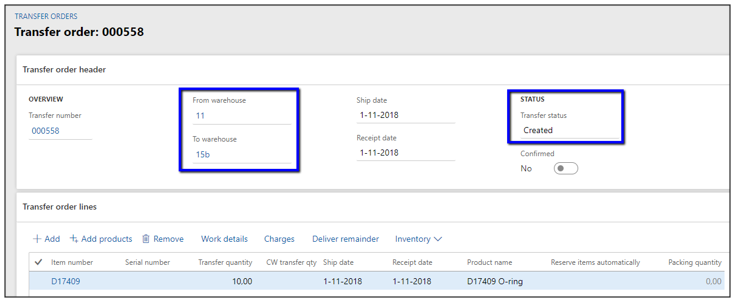
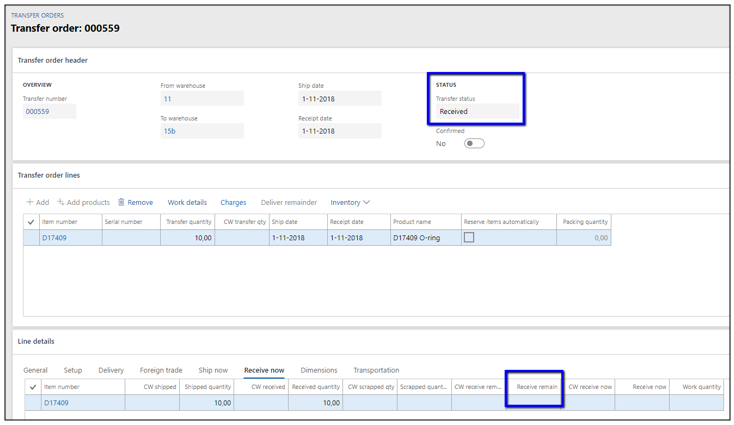
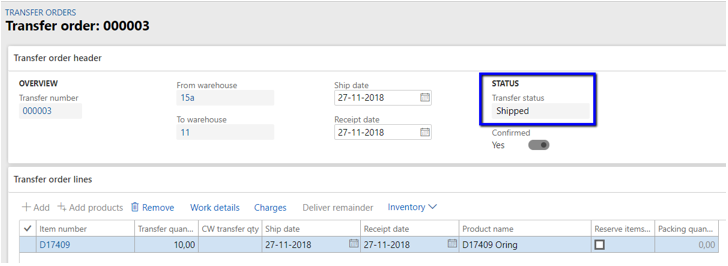
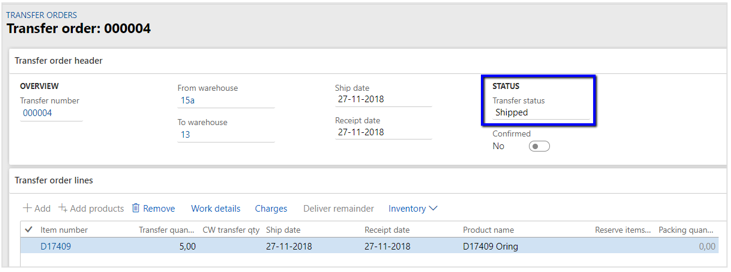
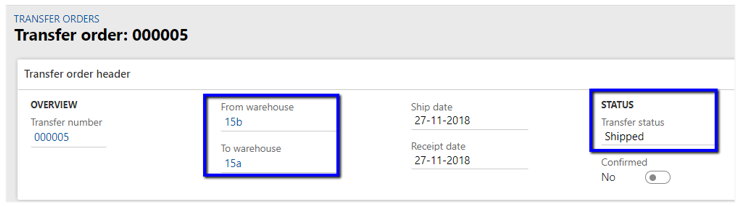
A transfer order with status ‘created’ in Microsoft Dynamics 365 for Finance and Operations , from main warehouse to the engineer’s van:
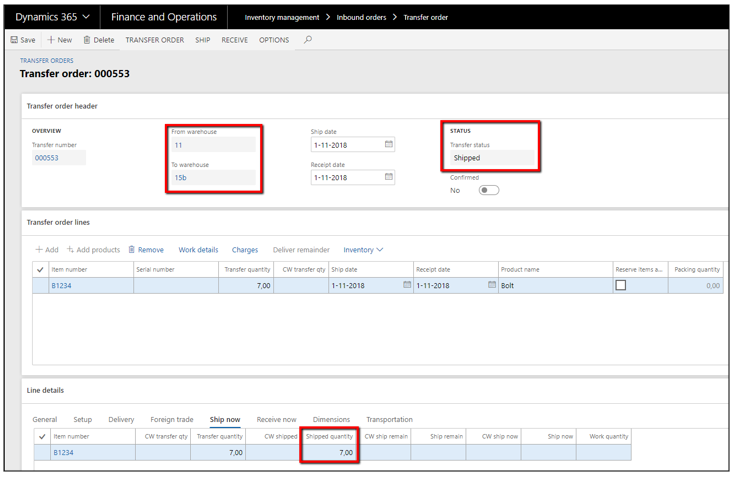
When the transfer order is posted, the status in Microsoft Dynamics 365 for Finance and Operations will be ‘Shipped’:
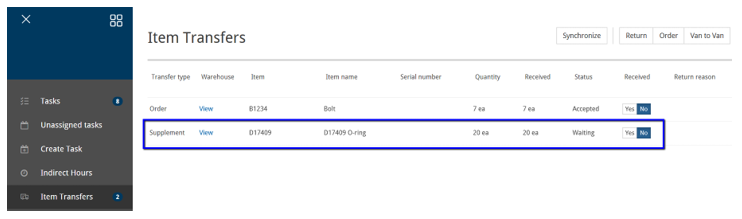
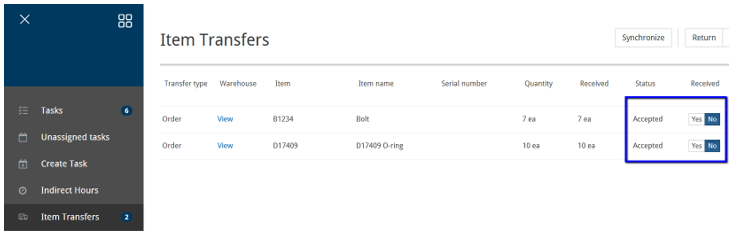
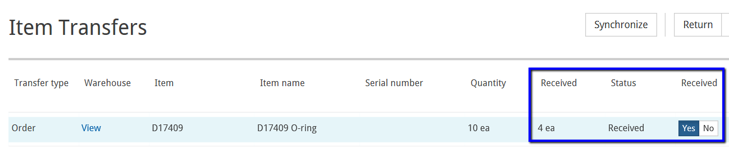
A transfer order in status ‘Shipped’ will trigger a message to MFS if the warehouse is a ‘VAN warehouse’ in Microsoft Dynamics 365 for Finance and Operations . After synchronization an item transfer of type ‘Supplement’ in status ‘Waiting’ will appear in the MFS application:
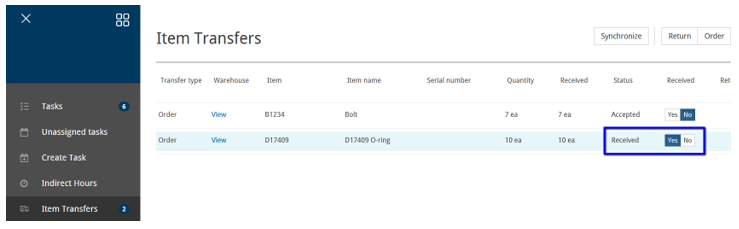
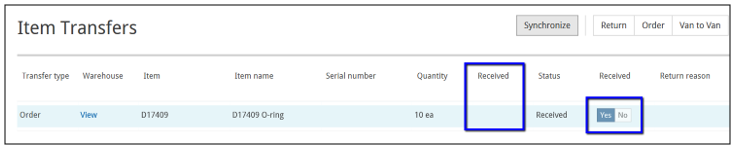
When the items are received by the engineer, the line should be updated by the engineer to ‘Received’ is Yes. Note that it is not possible to update the receipt quantity nor is it possible to reject the planned receipt.
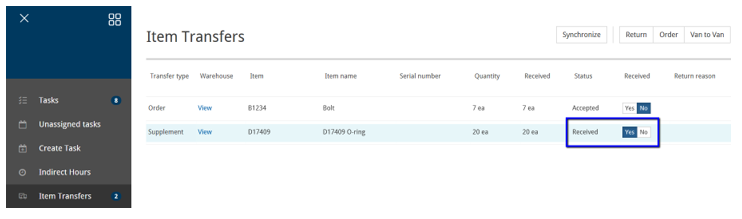
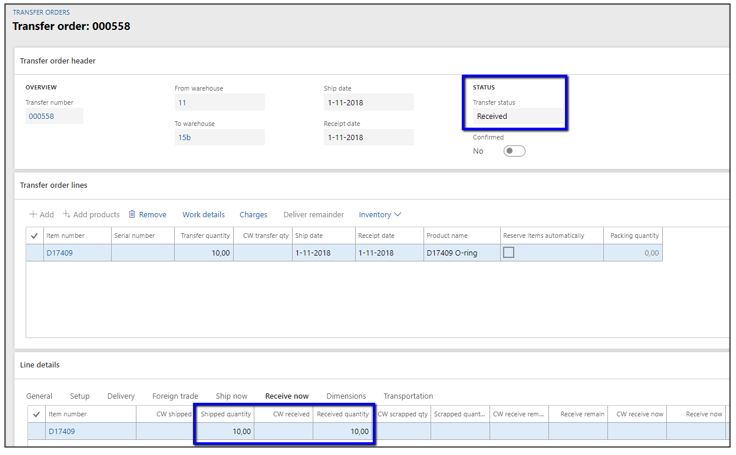
The receipt will trigger a message from MFS to Microsoft Dynamics 365 for Finance and Operations which needs to be synchronized manually to Microsoft Dynamics 365 for Finance and Operations . After synchronization, the Item Transfer record is removed in MFS and the message will be processed in Microsoft Dynamics 365 for Finance and Operations . The transfer order in Microsoft Dynamics 365 for Finance and Operations is updated to the status ‘Received’ which again will trigger a message to MFS with an update for the engineer’s inventory in MFS and a trigger to remove the item transfer from the devices.
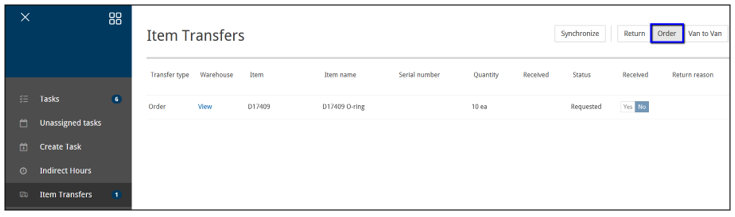
Instead of inventory being pushed by the back office or the main warehouse, the engineer has the possibility to request a transfer from the main warehouse to the engineer’s van as well. For this process, the engineer can use the function ‘Order’ in the form Item Transfer which will allow him to create an ‘Order Item Transfer’.
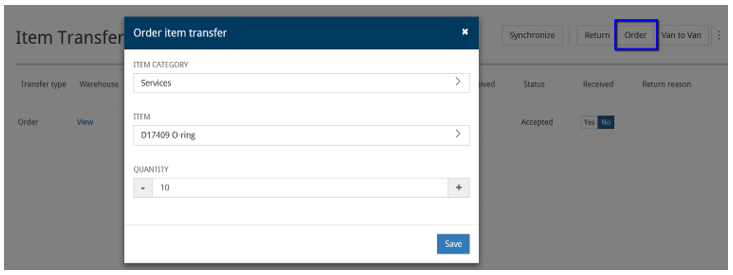
After save, an item transfer line of type ‘Order’ will be created in MFS with status ‘Requested’. This will trigger a message from MFS to Microsoft Dynamics 365 for Finance and Operations which needs to be synchronized manually to Microsoft Dynamics 365 for Finance and Operations . If the item transfer is not yet synchronizing, the line can be edited or deleted. It is not possible to set the ‘received’ flag if the item order transfer is not yet shipped from Microsoft Dynamics 365 for Finance and Operations .
After synchronization, the message will be processed in Microsoft Dynamics 365 for Finance and Operations . A new transfer order is created in status ‘Created’ and should be handled according to the standard Microsoft Dynamics 365 for Finance and Operations process.
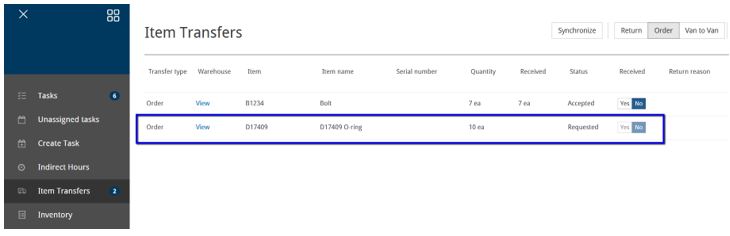
When the transfer order is being posted (Shipped) in Microsoft Dynamics 365 for Finance and Operations , an update will be sent to MFS which will switch the status of the ‘Order’ line to ‘Accepted’, with the value ‘Received’ still No.
When the engineer accepts the goods, the field ‘Received’ should be set to Yes which again will trigger a message to Microsoft Dynamics 365 for Finance and Operations in order to set the transfer order to ‘Received’ in Microsoft Dynamics 365 for Finance and Operations . The receipt in Microsoft Dynamics 365 for Finance and Operations will then trigger a message again to update the inventory level in the engineer’s van in MFS and a trigger to remove the item transfer from the device.
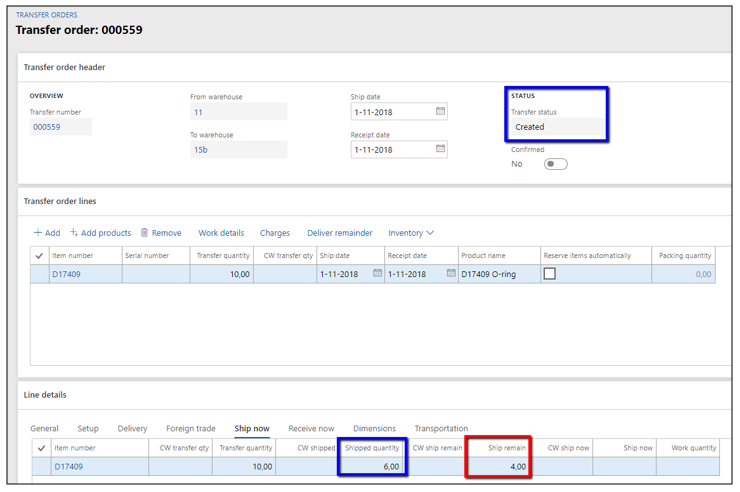
MFS 3.3.x now allows you to send and receive partial deliveries too. The engineer can order a certain number of items from the main warehouse, but they might not all items available. By doing a partial delivery, the engineer can have access to the partial update of his/her inventory.
Like with the previous process, the engineer starts by ordering items in their MFS app. An item transfer line is created with status requested. They synchronize the item transfer request with Microsoft Dynamics 365 for Finance and Operations .
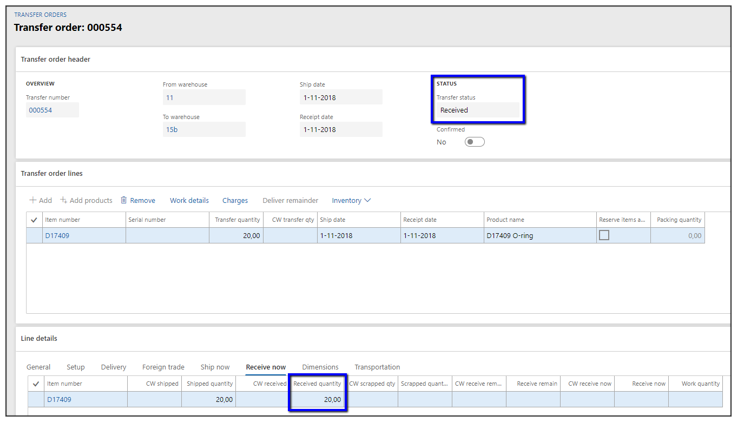
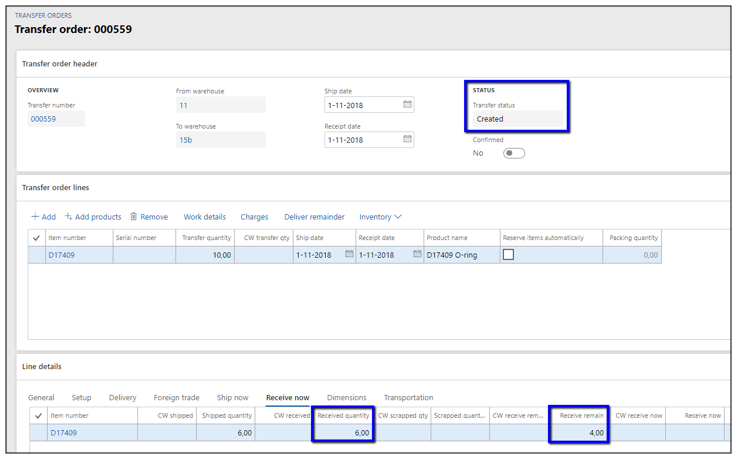
This will create a transfer order that will be processed by the warehouse. But instead of the full quantity order, the warehouse sends a part. Please note that the transfer order status stays at created (and does not go to shipped yet). And that there will be a quantity in the ship remain field in the ship now section of the transfer order in Microsoft Dynamics 365 for Finance and Operations .
After synchronization MFS will have filled the received quantity with the quantity shipped by the main warehouse, the status will have been set to accepted.
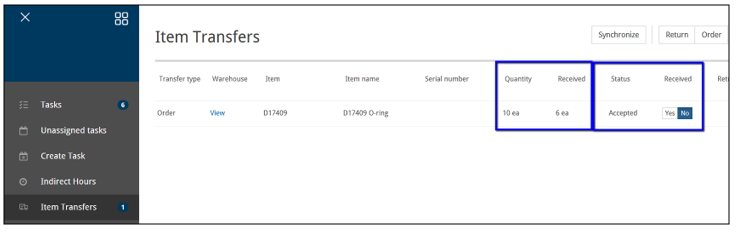
The engineer sets the received button to yes. This changes the status from accepted to received. They then manually synchronize with Microsoft Dynamics 365 for Finance and Operations .
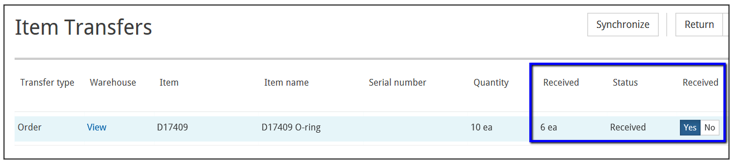
After synchronising the quantity received disappears and the received button is deactivated. This indicates that there is currently nothing left to receive.
After synchronizing the Microsoft Dynamics 365 for Finance and Operations transfer order is updated. On the receive now section of the order the quantity received is updated, but there also remains a quantity in the receive remain field. The transfer order status is still created at this point.
If a synchronization is done before the remaining quantity is shipped, the engineer’s van inventory is updated with the quantity of the first shipment.
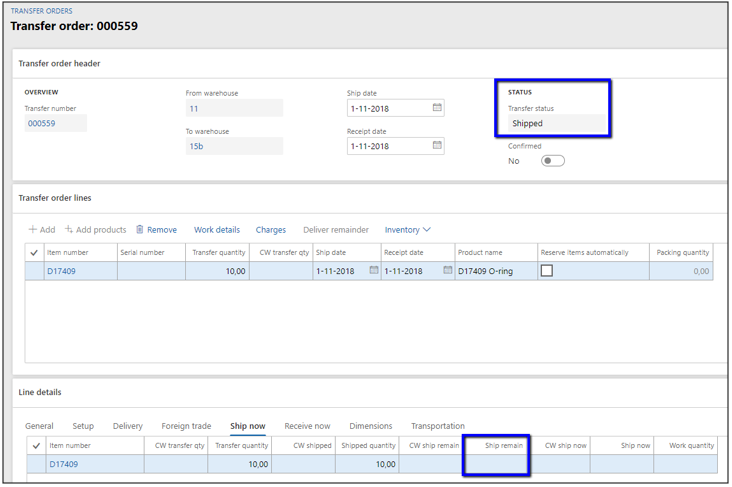
When the back order is ready for shipment, the warehouse processes the remaining quantity. By doing that the ship remain quantity will go to zero.

By posting the shipment the status of the transfer order changes to shipped.
After the next synchronization MFS has updated the received quantity with the remaining quantity that was shipped, the status is set to accepted again and the receive button is activated again.
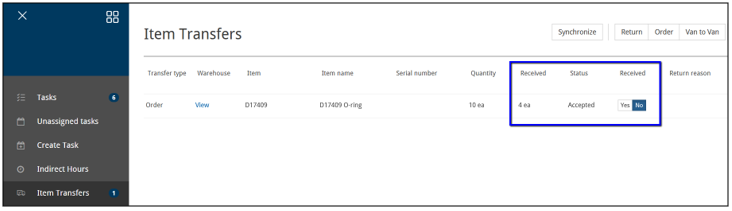
The engineer now sets the receive button to yes. The status changes to received.
The engineer then synchronizes MFS with Microsoft Dynamics 365 for Finance and Operations to confirm the receipt. This posts the final receipt in Microsoft Dynamics 365 for Finance and Operations . The transfer order status now changes to received and the receive remain quantity goes to zero.
After the final synchronization the item transfer line is deleted from the MFS screen.
And the van’s inventory will be updated with the remaining quantity.
Instead of inventory being pushed by the back office or the main warehouse, it is also possible to send a trigger from the back office to an engineer’s van in order to send something back from the van to the main warehouse. For this process, the back office creates a transfer order from the van to the main warehouse and selects ‘Confirm – Send pickup message to MFS’ under the ship > operations button. Note that the status should remain ‘Created’.
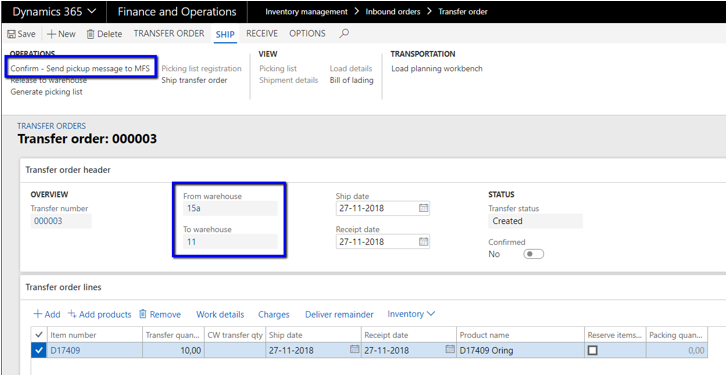
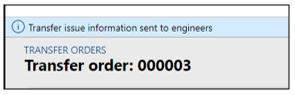
An info message is displayed, and a new XML trigger is created which can be synchronized to the MFS device.
After synchronization an item transfer of type ‘Pickup’ in status ‘Waiting’ will appear in the MFS application:
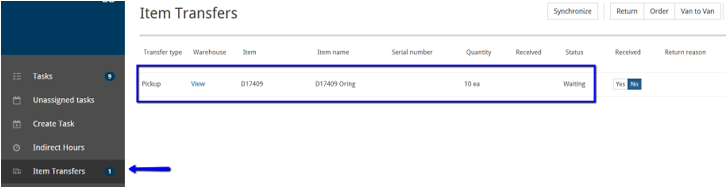
When the items are picked up (or sent) by the engineer, the line should be updated by the engineer to ‘Received’ is Yes. Received should be interpreted as being processed by the engineer.
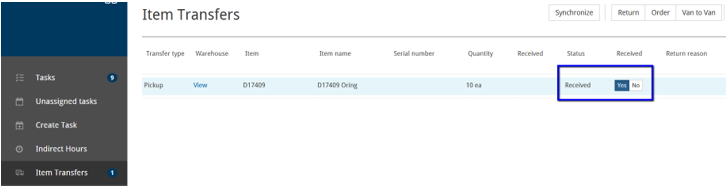
The receipt will trigger a message from MFS to Microsoft Dynamics 365 for Finance and Operations which needs to be synchronized manually to Microsoft Dynamics 365 for Finance and Operations . After the synchronization, the message will be processed in Microsoft Dynamics 365 for Finance and Operations and the item transfer is removed from the MFS device. When the message is processed in Microsoft Dynamics 365 for Finance and Operations , the transfer order is updated to the status ‘Shipped’. Upon receipt of the goods in the main warehouse, the back office will set the status of the transfer order to ‘Received’ which again will trigger a message to MSF with an update for the engineer’s inventory in MFS.
Apart from item transfers described in the previous paragraphs it is also possible to return items by using the ‘Return’ button in the Item Transfer form.
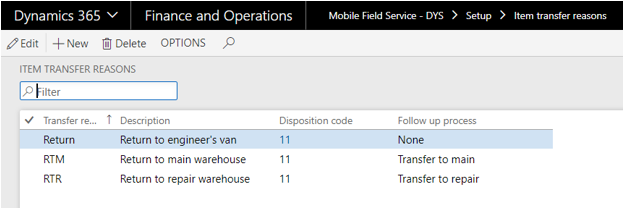
In Microsoft Dynamics 365 for Finance and Operations , three different type of returns can be defined. Each return reason code may trigger a different follow-up as setup in the Service Management module in Microsoft Dynamics 365 for Finance and Operations :
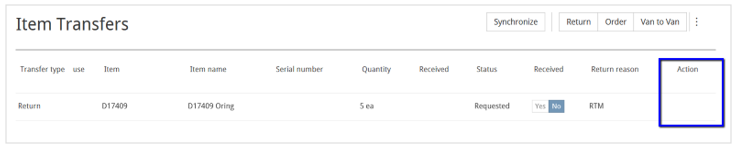
A Return Item Transfer of type Return to Main is created in MFS:
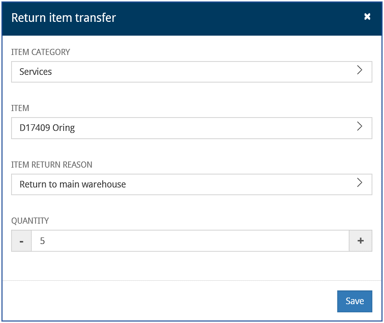
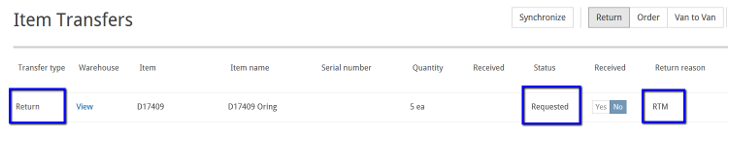
The item transfer line has transfer type ‘Return’ and status ‘Requested’ in MFS.
After synchronization, the item transfer line in MFS will not editable anymore. The synched message will be processed in Microsoft Dynamics 365 for Finance and Operations . A new transfer order is created and posted to status ‘Shipped’ in Microsoft Dynamics 365 for Finance and Operations (from warehouse ‘Van’, to warehouse ‘Main’). The main warehouse is defined in the engineer setup table of MFS in Microsoft Dynamics 365 for Finance and Operations .
Posting the transfer order to status ‘Shipped’ in Microsoft Dynamics 365 for Finance and Operations triggers a new message to MFS. This will deduct the inventory from the engineer’s warehouse in MFS. The return line is still visible and not editable MFS.
Posting the transfer order to status ‘Received’ in Microsoft Dynamics 365 for Finance and Operations triggers a new message to MFS. This will remove the return item transfer line from MFS.
Same procedure as for the return main warehouse, only the transfer order will be posted in the repair warehouse. The repair warehouse is defined in the engineer setup table of MFS in Microsoft Dynamics 365 for Finance and Operations .
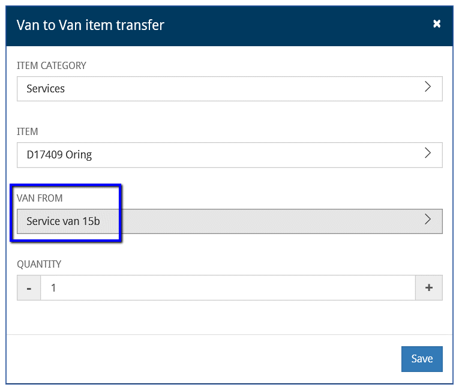
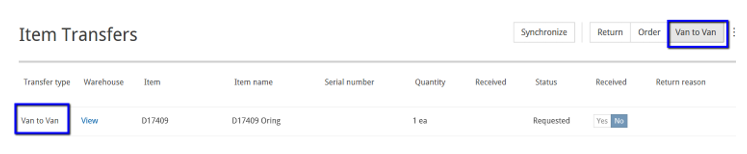
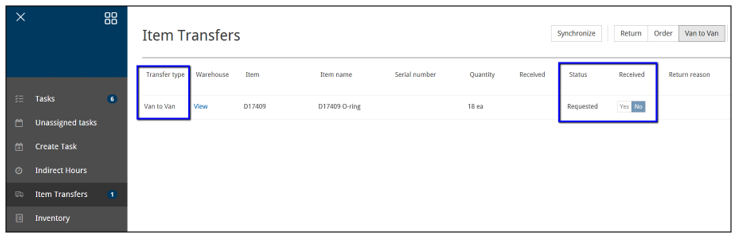
The engineer has the possibility to request a transfer from another engineer’s van. For this process, the engineer can use the function ‘Van to Van’ in the form Item Transfer which will allow him to create a ‘Van to Van Item Transfer’.
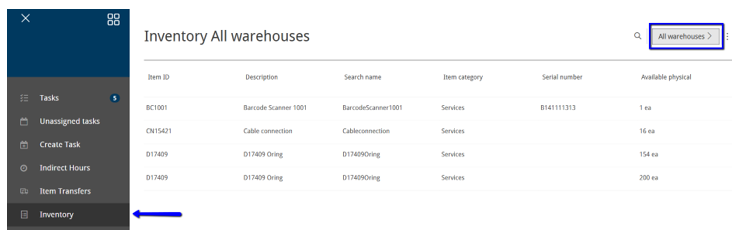
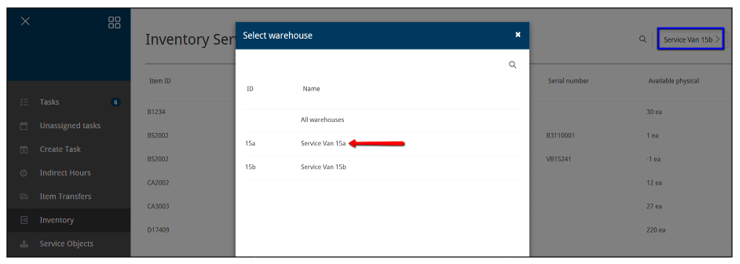
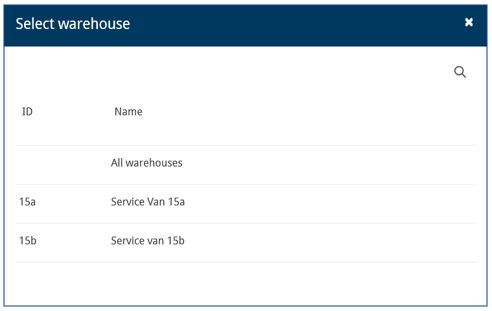
Before starting the process, the engineer can check in which van the item needed is on stock, by clicking on Inventory tab and selecting “All warehouses”. This allows the engineer to search for an item over all available vans in order to see where the item is available.
It is important to understand that the process is always started in the MFS of the engineer who is requesting the item transfer. So, the engineer who ‘delivers’ is not in the lead of the process.
After save, an item transfer line of type ‘Van to Van’ will be created in MFS with status ‘Requested’. This will trigger a message from MFS to Microsoft Dynamics 365 for Finance and Operations which needs to be synchronized manually to Microsoft Dynamics 365 for Finance and Operations . If the item transfer is not yet synchronizing, the line can be edited or deleted.
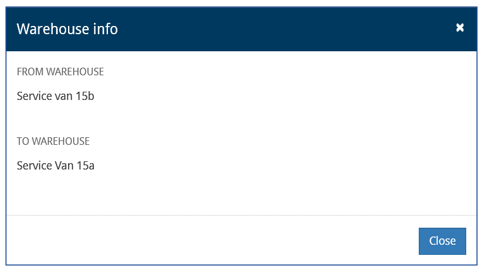
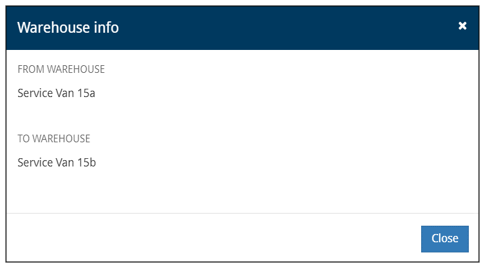
When ‘View’ link is clicked, the pop up that shows warehouse information is displayed:
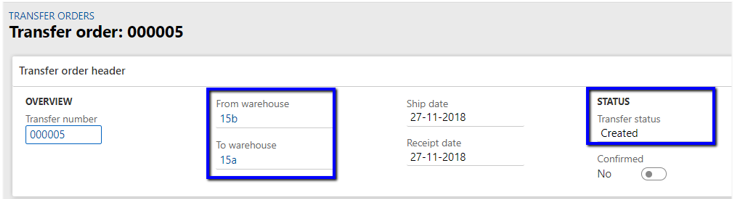
After synchronization, the item transfer line in MFS will not editable anymore. The synched message will be processed in Microsoft Dynamics 365 for Finance and Operations . A new transfer order is created (from warehouse ‘Van From’, to warehouse ‘Van To’). Also new message is generated and sent to the ‘Van From’ engineer with status ‘Requested’.
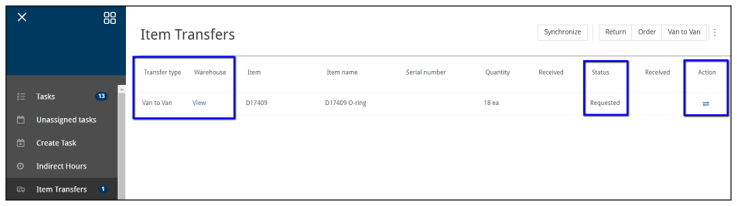
The engineer can change the requested quantity before shipping the transfer by clicking on the button in the ‘Action’ column. Changes can be done before item transfer is synchronized in Microsoft Dynamics 365 for Finance and Operations . After that the transfer status in MFS will change to ‘In Transfer’.
Processing the message in Microsoft Dynamics 365 for Finance and Operations will update the item transfer in Microsoft Dynamics 365 for Finance and Operations (change the status to ‘Shipped’) and trigger new message to the requesting MFS.
When the engineer (‘Van To’) synchronizes he can accept the goods. The field ‘Received’ should be set to Yes which again will trigger a message to Microsoft Dynamics 365 for Finance and Operations in order to set the transfer order to ‘Received’ in Microsoft Dynamics 365 for Finance and Operations . The receipt in Microsoft Dynamics 365 for Finance and Operations will then again trigger a message to update the inventory level in both engineer’s vans in MFS and a trigger to remove the item transfer from the device.
In Microsoft Dynamics 365 for Finance and Operations it is possible to delete transfer orders that are not shipped / received yet. Sending delete triggers for Van to Van, Order and Pickup Transfers is introduced in this version of MFS. It means that if transfer order is deleted in Microsoft Dynamics 365 for Finance and Operations , delete message will be triggered to MFS as well. After synchronization transfer order will be deleted from the device.
MFS allows you to send and receive partial deliveries from another service van too. The engineer can order a certain number of items from a colleague, but they might not all items available.
Before requesting a van-to-van delivery the engineer can check the other service van’s inventory by selecting another warehouse. But the engineer using the other warehouse might need some of their inventory on their own service tasks. By doing a partial delivery and receipt, the engineer can have access to the partial update of his/her inventory.
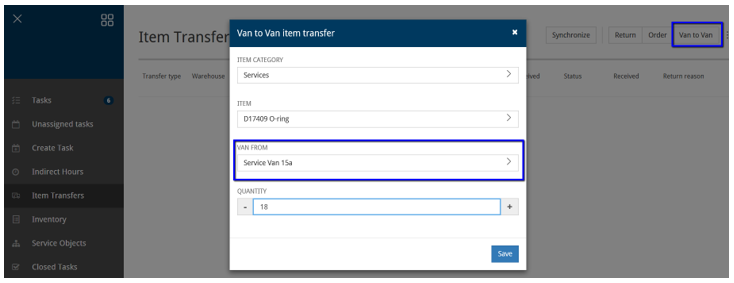
Like with the regular van-to-van process, the engineer starts by ordering items in their MFS app. In the item transfer section, they click on the van to van button in the top right corner. The item category (optional), the item number, the van from which the items should be delivered is selected and the desired quantity.
An item transfer line is created with transfer type ‘Van to Van’, the status is set to requested and the received button is deactivated. This item transfer request needs to be synchronized with Microsoft Dynamics 365 for Finance and Operations manually by the service engineer.
This will create a transfer order in Microsoft Dynamics 365 for Finance and Operations .
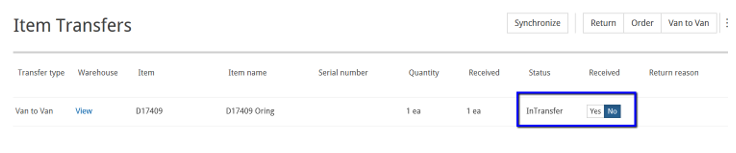
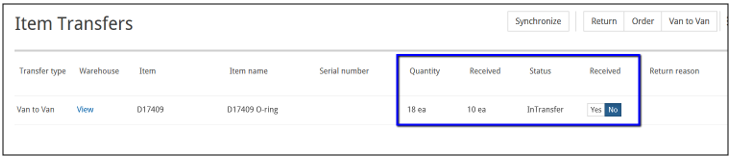
With the next synchronization the other engineer (the one who is shipping the items) will receive it on his app. The item transfer will have transfer type ‘van to van’, the status is requested, the receive button is hidden. Next to it, an action button with 2 arrows is active.
By clicking on warehouse – view, the service van/warehouse can see that is requesting the items.
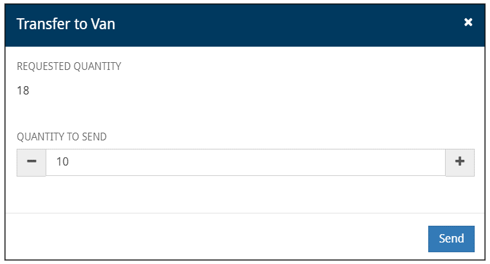
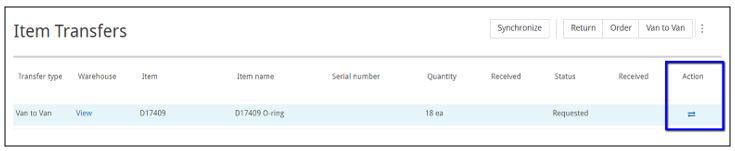
For any number of reasons, the engineer is not able to send the full quantity of the order. Instead a partial shipment is done. This is done by clicking on the action button (the 2 arrows).
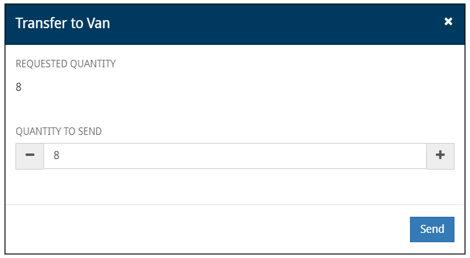
On the transfer to van screen the engineer adjusts the quantity to send. The requested quantity can also be seen here.
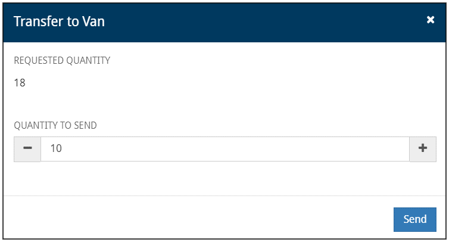
By clicking on send, an item transfer line is created. The quantity to send is shown under received. The status is changed to ‘In Transfer’. The action button is changed from the arrow sign to an undo sign.

The shipping engineer now synchronizes MFS with Microsoft Dynamics 365 for Finance and Operations .
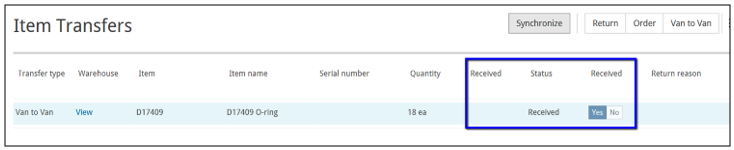
After synchronization, MFS of the receiving engineer will have filled the received quantity with the quantity shipped by the shipping engineer, the status will have been set to in transfer and the received button is active. The receiving engineer sets the received button to yes. This changes the status from accepted to received. Please note that the received quantity <> quantity ordered.

The receiving engineer then manually synchronize with Microsoft Dynamics 365 for Finance and Operations . After synchronising the quantity received disappears and the received button is deactivated. This indicates that there is currently nothing left to receive.
After synchronizing the inbound messages, the transfer order is updated in Microsoft Dynamics 365 for Finance and Operations . After synchronizing the staging triggers, the receiving engineer’s inventory is updated with the quantity of the first shipment.
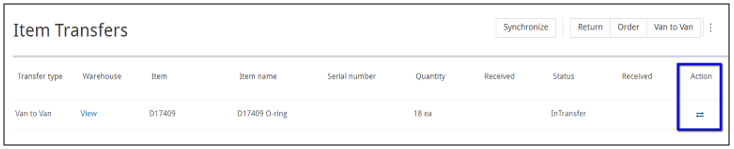
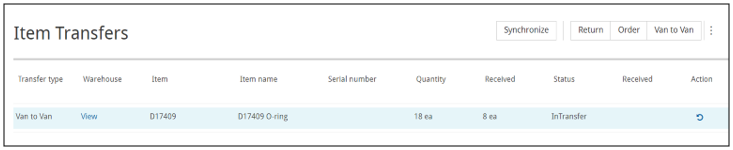
When the back order is ready for shipment, the shipping engineer processes the remaining quantity. He clicks op the action icon of the item transfer.
The transfer to van screen shows the remaining quantity as requested quantity (in this example 8 where the original/total quantity is 18). In theory, another partial shipment can be done by adjusting the quantity to send again.
By clicking on send, the item transfer line is changed. The quantity to send is shown under received. The status is changed to ‘In Transfer’. The action button is changed from the arrow sign to an undo sign again.
The shipping engineer now synchronizes MFS with Microsoft Dynamics 365 for Finance and Operations again. The action button and received quantity are removed to indicate the item transfer line is not active at that point.

After Microsoft Dynamics 365 for Finance and Operations has processed both the inbound messages and the staging triggers, the inventory quantity of the shipping engineer is updated.
After synchronization, MFS of the receiving engineer will have filled the received quantity with the remaining quantity shipped by the shipping engineer and the received button is active.

The receiving engineer sets the received button to yes. This changes the status from accepted to received. Please note that the received quantity <> quantity ordered.

The engineer then synchronizes MFS with Microsoft Dynamics 365 for Finance and Operations to confirm the receipt. This posts the final receipt in Microsoft Dynamics 365 for Finance and Operations . After Microsoft Dynamics 365 for Finance and Operations has processed both the inbound messages and the staging triggers, the item transfer line is deleted from the MFS screen. And the van’s inventory is updated with the remaining quantity.
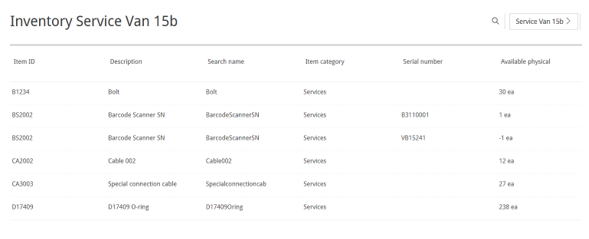
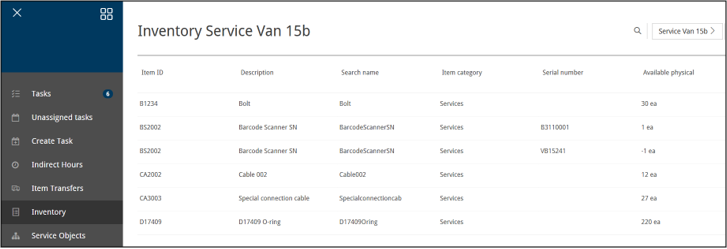
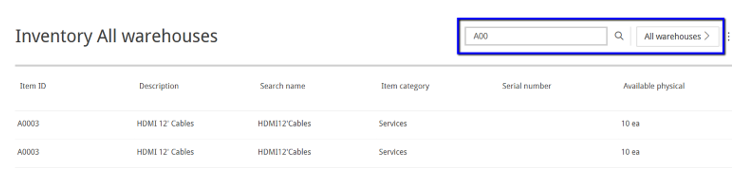
From the left menu bar, it is possible to select the option ‘Inventory’ that will bring the engineer to the overview of inventory in his van/warehouse. By default, the inventory from the warehouse that was selected when logging in to the application is being displayed.
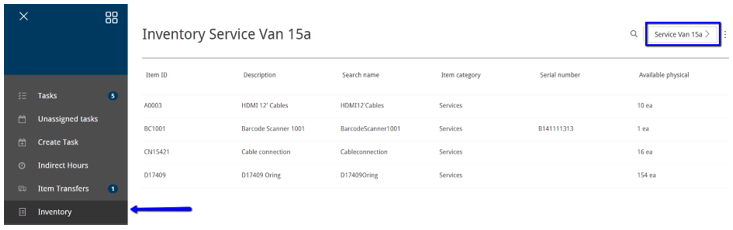
Via the button in the top right corner, it is possible to switch to another van/warehouse in order to see the inventory from for example a colleague. Note that the warehouses displayed here are the warehouses that are specifically setup for MFS in the back-office Microsoft Dynamics 365 for Finance and Operations .
Note that it is possible to search via information from every column by just typing in the text in the search field (this mechanism is used everywhere the search option is implemented).

Further, it is possible to search for items over multiple warehouses. Select option ‘All warehouses’ in the top right corner and search on any column value. In this example the overview shows the item in three warehouses. This information can be used for example to initiate a Van to Van transfer.
From the left menu bar, it is possible to select the option ‘Service Objects’ which will bring the engineer to the overview of all service objects that have been loaded to the engineer’s device.
Note that upon initial load of the data service objects are being transferred to the device, based on the service object query that has been specified in the MFS parameters.
The following features are supported in the overview of service objects:
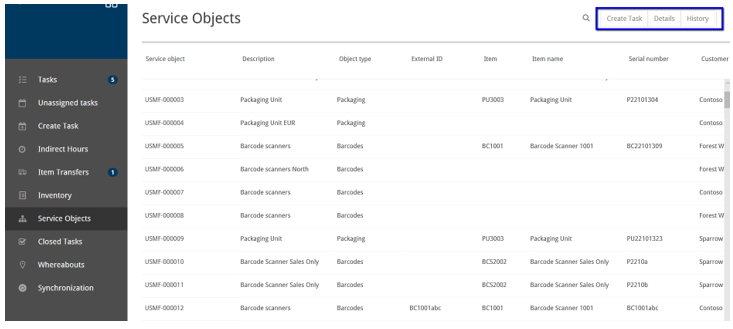
When a service task is created via the service object form, customer and service object are defaulted:
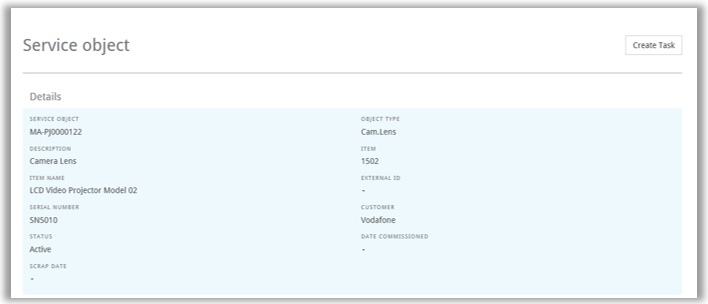
Details of a selected service object:
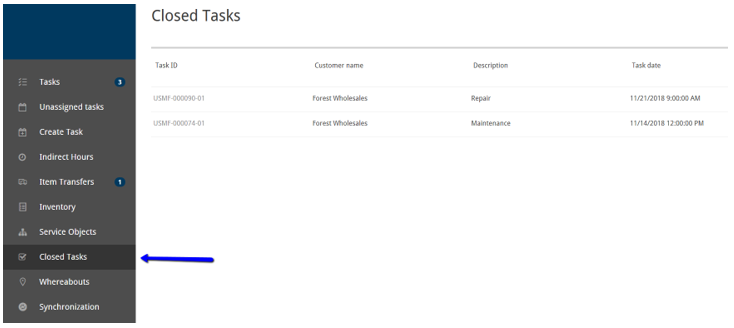
The ‘Closed Task’ view is a list page with tasks completed by this engineer. Details on the list page are task number, customer, description and completion date.
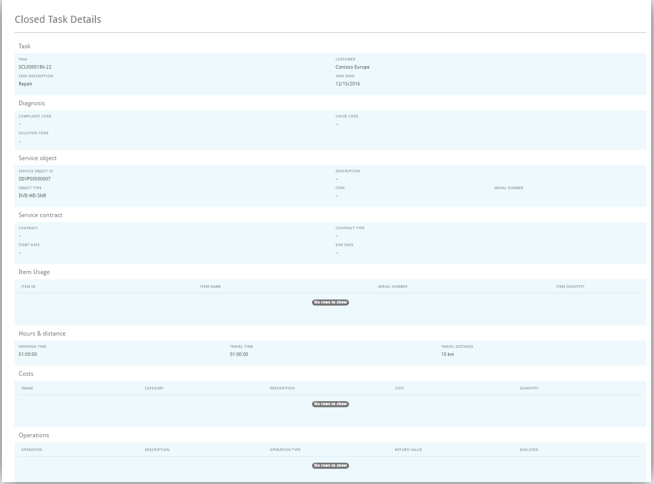
By clicking on a line, more details are available such as statistics codes, used items of this task, hours and distance, costs, operations and media.
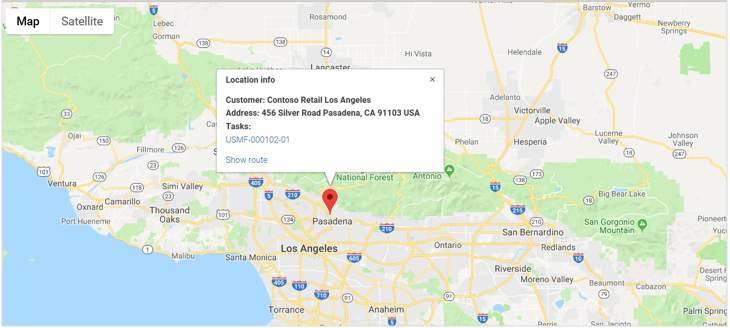
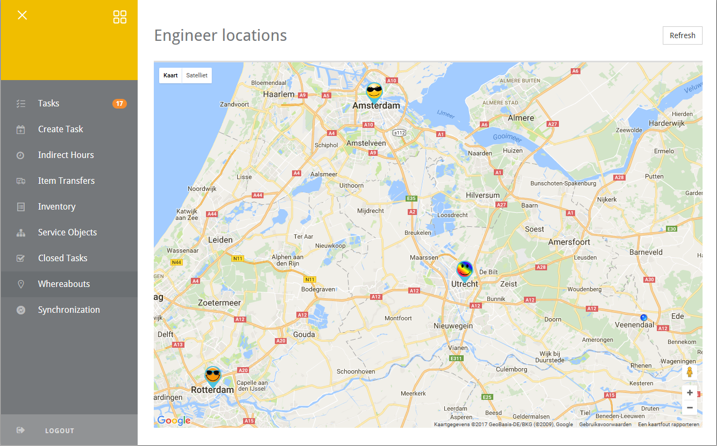
With the options Whereabouts it is possible to receive an update from the server of all engineer’s longitude and latitude, which will be presented in a map in MFS. For this function it is required to have an online connection in order to receive the last known position of the engineers. In off line mode it will display the latest synchronized records, which could possibly not be the latest accurate position anymore.
The function can for example be used by an engineer in order to check if any colleagues in his direct environment is having an item that is not available in the engineers’ own van stock.
On the service order MFS shows location info, i.e. address information.